Tips and tricks for a Section 508 compliant course on Storyline
Making a course accessible means that people with visual, hearing or mobility impairments can take it just like someone without disabilities.
When we talk about accessibility we must take into account three factors for different disabilities:
- Visual elements
- The audio
- Mobility
Visual elements
The visual elements of a course can be adapted to an accessible course thanks to the alternative text and tab order .
Articulate Storyline offers the option to add alternative text to the objects on your course slides to make them accessible to your visually impaired students through screen readers. Please note that Articulate only supports the JAWS screen reader with Internet Explorer, Firefox and Google Chrome.
To add the alternative text we can do it through the tab order window or by clicking with the right mouse button and clicking on accessibility.
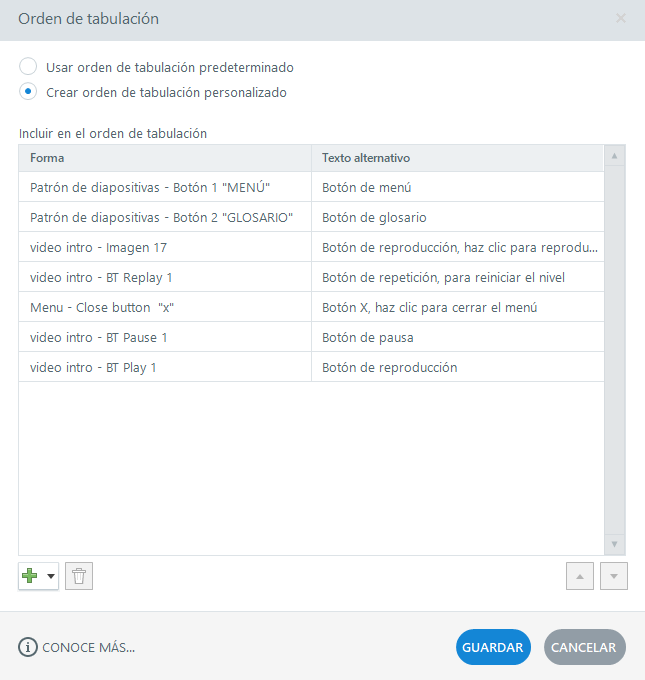
Tabulation order
The tab order window allows you to customize the order in which you need your objects to be navigated with the keyboard and read by a screen reader. You can also use it to manage the alternative text of all objects on your slide.
These are the steps you must follow to add text and arrange it:
1. Select the slide you want to customize
2. Go to the Storyline Home tab and click on the Tab Order option.

3. Once you open the Tab Order window, you will see that all the objects on the slide appear by default in the tab order, including the objects on the layers and the slide master.
Although the objects on the slide master appear in the Tab Order window, you need to go to the slide master to modify whether you want these objects to appear in tab order.
To do this, go to View, Slide Master or press the F4 key. To remove the objects from the slide master from the tab order you need to select the object or objects in question, right click and select the Accessibility option, there you will see that the option for alternative text is enabled, to remove it you only need to uncheck the box.
If, on the other hand, you want the alternative text box to be checked you will see that below it there is a field for modifying the object’s alternative text, although you can also modify it through the tab order window of the slide that is using that slide master.
When deselecting the objects of the slide master we must take into account the groups, since with them we must deselect the box as a group and with the elements that make it up individually.
4. Once you have all the elements in the correct tab order it is time to add the alternative text
Note that, if an object has no alternative text, the screen reader will read the name under which the object appears on the timeline.
If you do not want an object to be read, select it in the list and click on delete (this does not remove the object from the slide, it only hides it from screen readers).
5. Finally, click save when you are done.
Once you have everything done it is time to test it with the JAWS screen reader. This step is essential as it will help you understand how the tool works and will allow you to check that the program is reading all the objects in the correct order and with the correct description.
Here are some suggestions for writing appropriate alternative text:
– Convey the same content and information presented by the object or image
– Be concise without skimping on relevant information.
– Transmit only information that is not already captured in other text on the screen
– Avoid the phrases “picture of” and “graph of”, and provide only the information the student needs.
– Avoid abbreviations and excessive punctuation Do not use punctuation marks such as ***, which screen readers will read as “asterisk, asterisk, asterisk”.
Audio
To provide accessibility to people with hearing disabilities we must add closed captions (CC – Closed Captions) to our course.
Here you will find more information on how to import subtitles into Stoyline 360.
By default the subtitles are disabled and the student is required to click the subtitle button to activate it. In order for them to be displayed automatically we need to create a variable that is true and not false.
Mobility
Most Storyline tools and objects are keyboard accessible. These include buttons, shapes, text bubbles, text boxes, markers, tables, sliders and dials.
There are only two elements that can only be operated with the mouse and are therefore not considered accessible. These are the drag-and-drop questions and key points.
Did you find this entry useful? Share it on social media and contact us if we need help adapting your courses for all types of learners.

